
If you’re just here for the unicode specifics drop down into the “Creating custom unicode” section.
Spring Cleaning #
This spring, Gnome 40 hit distros. I actually quite like Gnome 40, but unfortunately many of my extensions stopped working.
I was an absolutely huge fan of argos which was a Gnome extension was inspiraed from BitBar. The extension was quite simple, yet incredibly powerful. It had a healthy (from BitBar) plugin library. The basic workflow was as follows:
- Create a script/executable that does something, and exits with stdout in the required schema
- Place this script into the argos evaluation path
- Name the file on its execution interval; e.g.
vpn.left.10s.sh
So using the example filename. I had a shell script which would look for openconnect in my process list (probably better to look for tun0), and if found, return that I’m on the VPN, else, VPN disconnected. The statement left, would position it leftmost. The 10s would evaluate the script every 10 seconds:
#!/bin/bash

pgrep openconnect > /dev/null
if [[ $? == "0" ]]; then
    echo "🧑💻 VPN"
else
    echo "💻 VPN Disconnected"
fi
This was great. But it stopped working even as early as Gnome 3.36. So with the breaking, and and understandably unwilling maintainer, I set off in search of an alternative DE.
Time to Tile #
I don’t really fancy KDE, so that was out. XFCE is great, but wasn’t feeling it. Before installing Gnome 40 I had played around with Pop Shell. While very cool, it kept reminding me of when I used i3wm in college.
I use Arch Linux and i3 usually comes with a sparse config. I had to begin a search for tools. I of course use all the standard tools:
I’m sure there are a few others in there (and if there are find them in my dots), but specifically we’re here to talk about i3status-rust. The tool bills itself as:
i3status-rsis a feature-rich and resource-friendly replacement for i3status, written in pure Rust. It provides a way to display “blocks” of system information (time, battery status, volume, etc) on the i3 bar. It is also compatible with sway.
These blocks are great! A ton of them provide what I did with argos, but tools included. There are great docs for all the supported blocks. And here is how a simple bar can look:

All the plugins here are stock. But i3status-rust provides some customizations with the “Custom” block.
Tracking Stocks - Creating a Custom Block #
I work for a publicly traded company. I think it’s a interesting incentive to have our stock price in the bar. As you can see from the photo, the common style for the bar is a glyph followed by text. With the use of a Custom block, text is displayed in the bar. But to achieve colors you must use JSON.
We need:
- A script to hit a public stock API
- A custom block declared
- Returning JSON
- Using states for color
Resulting in:
[[block]]
block = "custom"
command = "/home/tolson/bin/stock-ticker.py"
json = true
For the script:
#!/usr/bin/python
import json
import sys
from urllib.request import urlopen

api_token = "REDACTED-GET-A-TOKEN"
stock_symbols = ["SPSC"]

try:
    response = urlopen(
        "https://cloud.iexapis.com/stable/stock/market/batch?symbols=" + \
        ','.join(stock_symbols) + \
        "&types=quote&filter=symbol,latestPrice,change,changePercent&displayPercent=true&token=" + \
        api_token
    )
except Exception as e:
    print(f'{{"text": "{e}", "state":"Warning"}}')
    sys.exit(1)

json_data = json.loads(response.read())

for stock_symbol in stock_symbols:
    stock_quote = json_data[stock_symbol]["quote"]
    price_current = stock_quote["latestPrice"]
    price_changed = stock_quote["change"]

    state = "Warn" if float(stock_quote["change"]) < 0 else "Good"

    # This is admittedly gross from the custom unicode + fstring + json
    # I don't json encode because of unforeseen strangeness.
    print('{"text": "\uf10f $' + f'{price_current:.2f}", "state":"{state}"}}')
Woah, what’s that \uf10f, interesting… See below.
Now assuming you have the block in config, python script executable and in $PATH, an API token, and unicode, you’re done. But! We still have the unicode to solve for.
Creating custom unicode #
To create custom unicode let’s start with a few installs:
Let’s consider the \uf10f character from the script. Why did I chose this?
Unicode contains a Private Use Area. This is a block of characters in ranges:
U+E000..U+F8FFPrivate Use Area - 6,400 code pointsU+F0000..U+FFFFDSupplementary Private - 65,534 code pointsU+100000..U+10FFFDSupplementary Private - 65,534 code points
This is a technical blog and so this must feel similar to Private address space, which grants us usage of:
10.0.0.0/8172.16.0.0/12192.168.0.0/16
We have access to the private use chars so let’s use it. My company isn’t big enough to be featured in a font pack like font-awesome, but this is using the same tech.
So great let’s make a glyph and font. This section of the blog will turn much more instructional.
1. Create vector logo #
This is an optional step assuming you cannot find a vectored version of your company logo.
- Fetch a logo for your company.
- Pull into gimp
- Crop image
- Delete and vector background
2. Create the glpyh #
Inkscape is a fantastic vector tool. We’re going to use it to create an svg of our png logo. We do this because vectorized glyphs are needed to create fonts. Despite our font just being used in a bar. It’s important that it can maintain scale. To recap, the output of this step will be to take our png logo and turn it into a svg.
- Launch Inkscape
- Open logo png
- Import Options:
- Image Import Type: Embed
- Image DPI: From file
- Image Rendering Mode: None
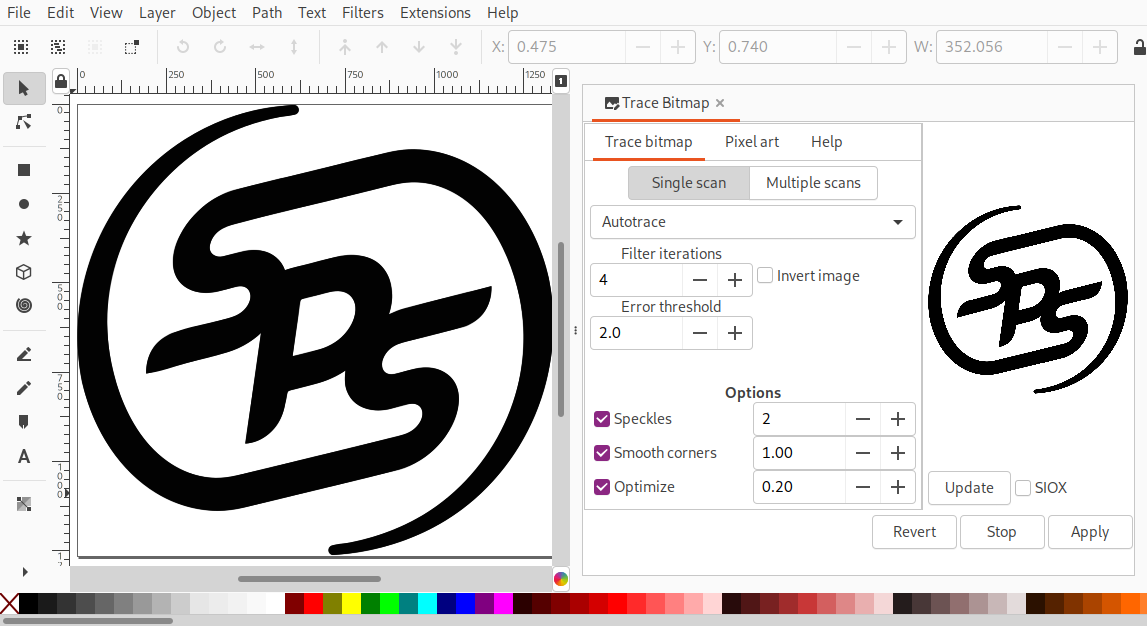
- Path > Trace Bitmap…
- Select:
- Trace Bitmap Tab
- Single Scan
- Autotrace
- Apply
- File > Save > logo.svg
Similarly can be done with ImageMagick and Potrace:
convert logo.png logo.pnm
potrace logo.pnm -s -o logo.svg
But one problem here is that you may need to tweak ImageMagick’s config to trace it properly, this is why I would prefer InkScape for this step.
3. Create Font #
There is two ways to add the font. One is with the FontForge GUI app, another is using the fontforge python library. It’s much easier to automate with the python so I suggest that.
I will just make the assumption your logo.svg is in the same directory:
import fontforge
blank = fontforge.font()
blank.encoding = "UnicodeBMP"
glyph = blank.createChar(int("F10F", 16))
glyph.importOutlines("logo.svg")
blank.generate("company.ttf")
Here it is by video:
4. Install font #
Quite simply:
sudo cp company.ttf /usr/share/fonts/TTF/
And all should be well and good in the world. Enjoy your unicode.
